Container Connector(CC) Setup
the official CC documentation is here: Install the F5 Kubernetes BIG-IP Controller
BIG-IP setup
To use F5 Container connector, you’ll need a BIG-IP up and running first.
Through the Jumpbox, you should have a BIG-IP available at the following URL: https://10.1.10.60
Warning
Connect to your BIG-IP and check it is active and licensed. Its login and password are: admin/admin
Note
If your BIG-IP has no license or its license expired, renew the license. You just need a LTM VE license for this lab. No specific add-ons are required (ask a lab instructor for eval licenses if your license has expired)
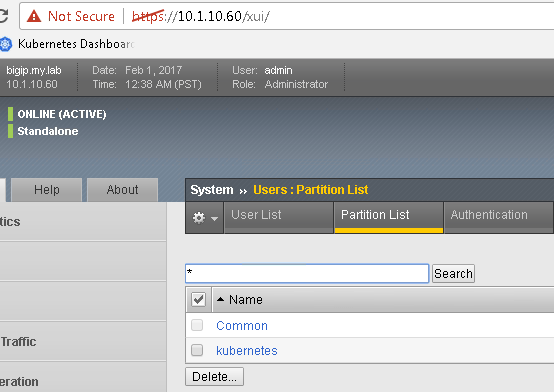
You need to setup a partition that will be used by F5 Container Connector.
To do so go to : System > Users > Partition List. Create a new partition called “kubernetes”
(enter the name “kubernetes” and take all the default settings and click Finished)
Once your partition is created, we can go back to Kubernetes to setup the F5 Container connector
Container Connector deployment
Here we consider you have already retrieved the F5 container connector image and loaded it in the environment.
Note
Because we have already loaded docker images for this environment, this can be skipped.
Normally if you haven’t loaded it in your environment, you have a few choices to load the images i.e.:
- load it on all your systems with the docker load -i <file_name.tar>
- load it on a system and push it into your registry
Now that our container is loaded, we need to define a deployment: Kubernetes deployments and create a secret to hide our bigip credentials. Kubernetes secrets
On the master , we need to setup a deployment file to load our container and also setup a secret for our big-ip credentials
Note
Utilizing a wrapper called MRemoteNG for Putty and other services. MRNG hold credentials and allows for multiple protocols (i.e. SSH, RDP, etc.), makes jumping in and out of SSH connections easier
On your desktop select MRemoteNG, once launched you’ll see a few tabs similar to the example below, please open up Kubernetes tab
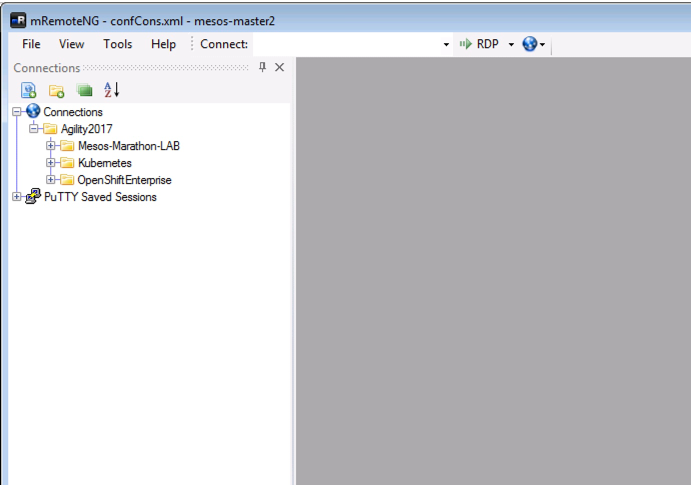
Select the “KUBERNETES-CLUSTER and K8s Master and double click to connect”
To setup the secret containing your BIG-IP login and password, you can run the following command:
kubectl create secret generic bigip-login --namespace kube-system --from-literal=username=admin --from-literal=password=admin
you should see something like this:

create a file called f5-cc-deployment.yaml. Here is its content: —> Please use the file in /home/ubuntu/f5-demo
If you’re not used to using Linux/Unix, please ask for help and we’ll come over and show you how to create and edit files in the CLI
apiVersion: extensions/v1beta1
kind: Deployment
metadata:
  name: k8s-bigip-ctlr-deployment
  namespace: kube-system
spec:
  replicas: 1
  template:
    metadata:
      name: k8s-bigip-ctlr
      labels:
        app: k8s-bigip-ctlr
    spec:
      containers:
        - name: k8s-bigip-ctlr
          image: "f5networks/k8s-bigip-ctlr:1.0.0"
          imagePullPolicy: IfNotPresent
          env:
            - name: BIGIP_USERNAME
              valueFrom:
                secretKeyRef:
                  name: bigip-login
                  key: username
            - name: BIGIP_PASSWORD
              valueFrom:
                secretKeyRef:
                  name: bigip-login
                  key: password
          command: ["/app/bin/k8s-bigip-ctlr"]
          args: [
            "--bigip-username=$(BIGIP_USERNAME)",
            "--bigip-password=$(BIGIP_PASSWORD)",
            "--bigip-url=10.1.10.60",
            "--bigip-partition=kubernetes",
            "--namespace=default"
          ]
Note
You can use the templates on your jumpbox desktop or the Kubernetes Master under /home/ubuntu/f5-demo. If you use those files, you’ll need to :
- check the container image path in the deployment file is accurate
- Update the “bindAddr” in the configMap for an IP you want to use in this blueprint.
If you have issues with your yaml and syntax (identation MATTERS), you can try to use an online parser to help you : Yaml parser
Once you have your yaml file setup, you can try to launch your deployment. It will start our f5-k8s-controller container on one of our node (may take around 30sec to be in a running state):
kubectl create -f f5-cc-deployment.yaml

kubectl get deployment k8s-bigip-ctlr-deployment --namespace kube-system

FYI, To locate on which node the container connector is running, you can use the following command:
kubectl get pods -o wide -n kube-system
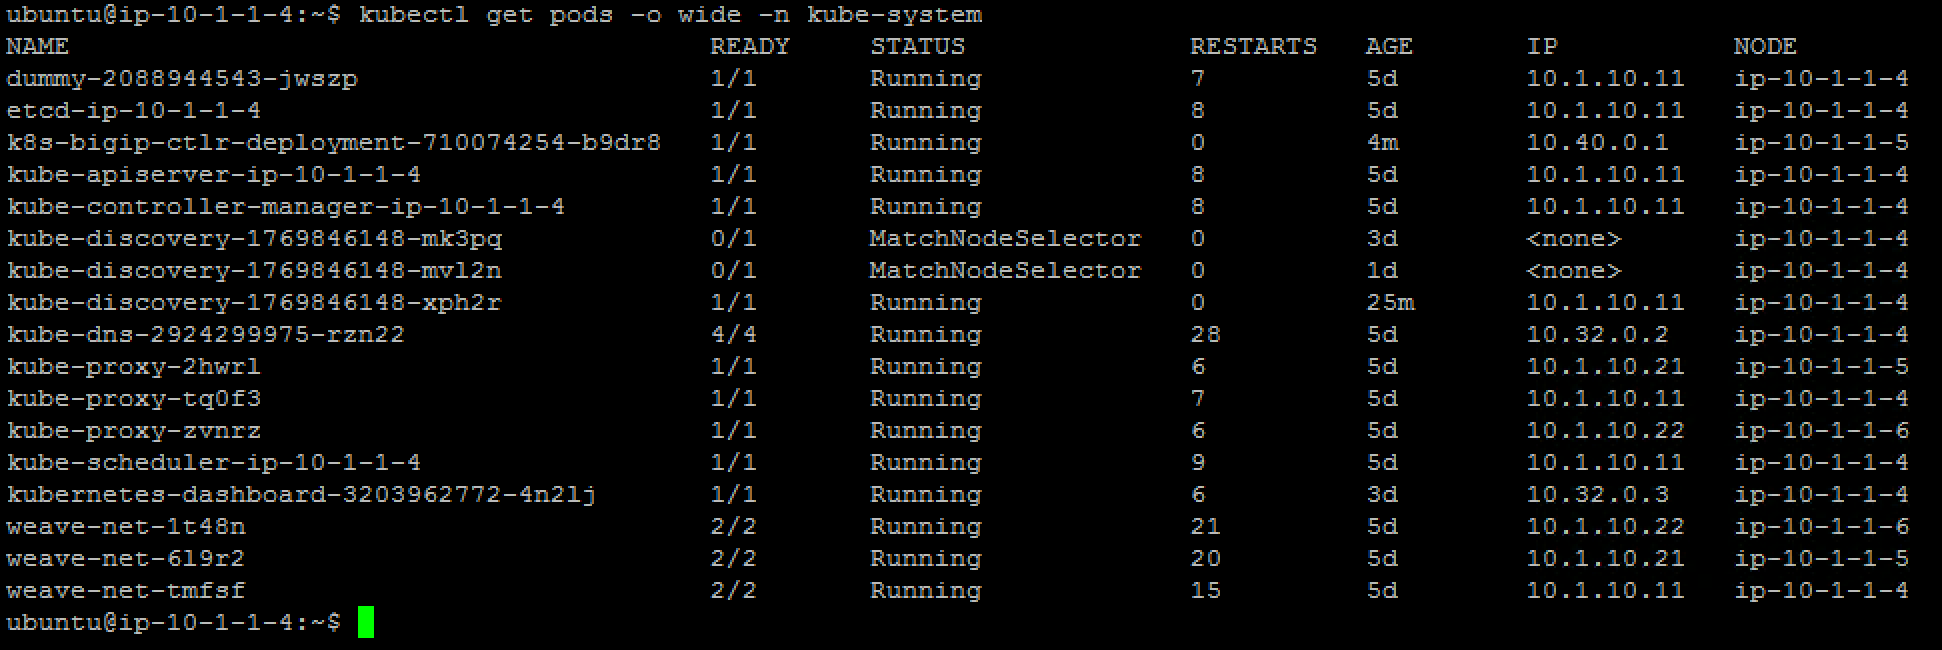
We can see that our container is running on the nodes
If you need to troubleshoot your container, you have two different ways to check the logs of your container:
- via kubectl command (recommended - easier)
- by connecting to the relevant node and use docker command. Here you’ll need to identify on which node it runs and use docker logs command:
If you want to use kubectl command: you need to use the full name of your pod as showed in the previous image and run the command kubectl logs k8s-bigip-ctlr-deployment-<id> -n kube-system
kubectl logs k8s-bigip-ctlr-deployment-710074254-b9dr8 -n kube-system

If you want to use docker logs command
On Node1 (or another node depending on the previous command):
sudo docker ps

Here we can see our container ID: 7a774293230b
Now we can check our container logs:
sudo docker logs 7a774293230b

You can connect to your container with kubectl also:
kubectl exec -it k8s-bigip-ctlr-deployment-710074254-b9dr8 -n kube-system  -- /bin/sh

cd /app

ls -lR

exit