Container Connector Usage
Now that our container connector is up and running, let’s deploy an application and leverage our CC.
The environment already has a container called f5-demo-app already loaded as an image (Application provided by Eric Chen - F5 Cloud SA). It is available via docker hub - chen23/f5-demo-app
To deploy our front-end application, we will need to do the following:
- Define a deployment: this will launch our application running in a container
- Define a ConfigMap: ConfigMap can be used to store fine-grained information like individual properties or coarse-grained information like entire config files or JSON blobs. It will contain the BIG-IP configuration we need to push
- Define a Service: A Kubernetes service is an abstraction which defines a logical set of pods and a policy by which to access them. expose the service on a port on each node of the cluster (the same port on each node). You’ll be able to contact the service on any <NodeIP>:NodePort address. If you set the type field to “NodePort”, the Kubernetes master will allocate a port from a flag-configured range (default: 30000-32767), and each Node will proxy that port (the same port number on every Node) into your Service.
App Deployment
On the master we will create all the required files:
Create a file called my-frontend-deployment.yaml —> Please use the file in /home/ubuntu/f5-demo
apiVersion: extensions/v1beta1
kind: Deployment
metadata:
  name: my-frontend
spec:
  replicas: 2
  template:
    metadata:
      labels:
        run: my-frontend
    spec:
      containers:
      - image: "chen23/f5-demo-app"
        env:
        - name: F5DEMO_APP
          value: "frontend"
        - name: F5DEMO_BACKEND_URL
          value: "http://my-backend/"
        imagePullPolicy: IfNotPresent
        name: my-frontend
        ports:
        - containerPort: 80
          protocol: TCP
Create a file called my-frontend-configmap.yaml —> Please use the file in /home/ubuntu/f5-demo
kind: ConfigMap
apiVersion: v1
metadata:
  name: my-frontend
  namespace: default
  labels:
    f5type: virtual-server
data:
  schema: "f5schemadb://bigip-virtual-server_v0.1.2.json"
  data: |-
    {
      "virtualServer": {
        "frontend": {
          "balance": "round-robin",
          "mode": "http",
          "partition": "kubernetes",
          "virtualAddress": {
            "bindAddr": "10.1.10.81",
            "port": 80
          }
        },
        "backend": {
          "serviceName": "my-frontend",
          "servicePort": 80
        }
      }
    }
Create a file called my-frontend-service.yaml —> Please use the file in /home/ubuntu/f5-demo
apiVersion: v1
kind: Service
metadata:
  name: my-frontend
  labels:
    run: my-frontend
spec:
  ports:
  - port: 80
    protocol: TCP
    targetPort: 80
  type: NodePort
  selector:
    run: my-frontend
We can now launch our application :
kubectl create -f my-frontend-deployment.yaml

kubectl create -f my-frontend-service.yaml

kubectl create -f my-frontend-configmap.yaml

to check the status of our deployment, you can run the following commands:
kubectl get pods -n default

kubectl describe svc -n default

Here you need to pay attention to:
- the NodePort value. That is the port used by Kubernetes to give you access to the app from the outside. Here it’s 32402
- the endpoints. That’s our 2 instances (defined as replicas in our deployment file) and the port assigned to the service: port 80
Now that we have deployed our application sucessfully, we can check our BIG-IP configuration.
Warning
Don’t forget to select the “kubernetes” partition or you’ll see nothing
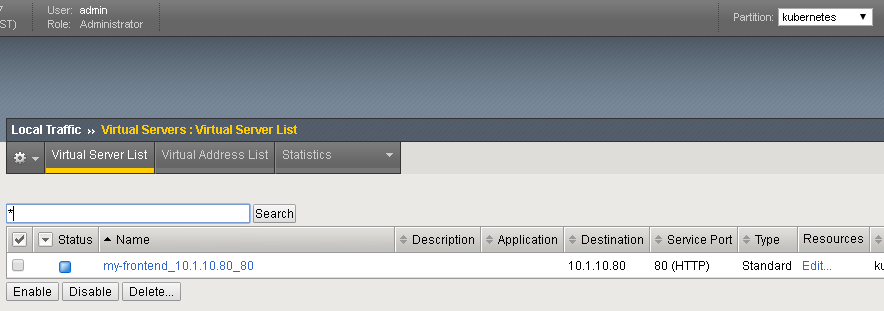
Look at the Pool_list to see the Pool members Local Traffic -> Pools -> “default_my_frontend” -> Members

Here you can see that the pool members listed are all the kubernetes nodes.
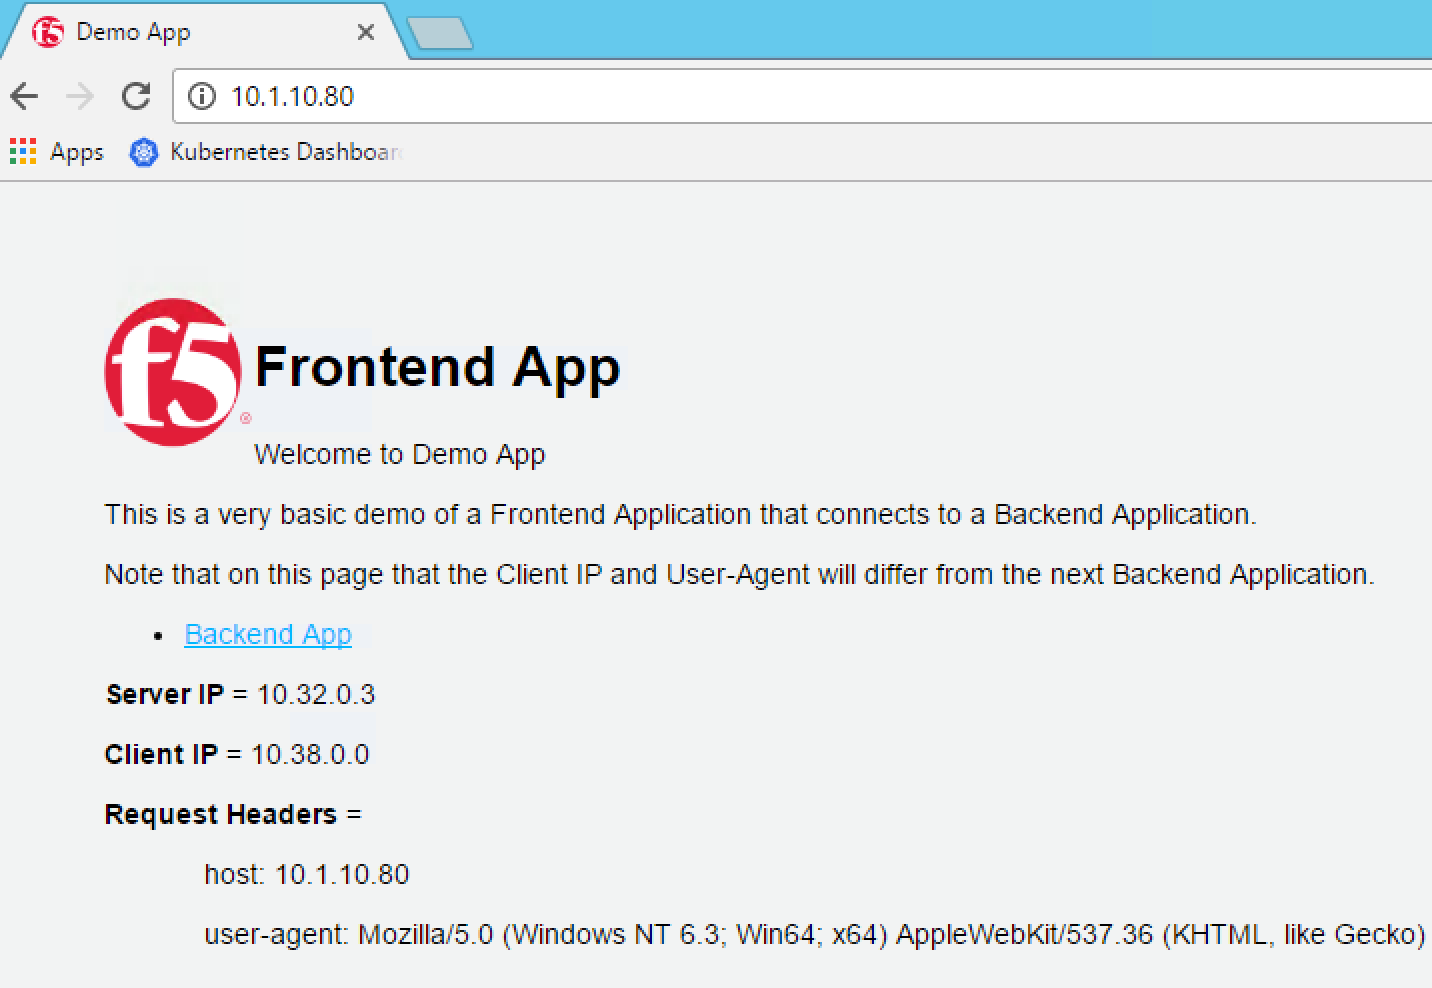
Now you can try to access your application via your BIG-IP VIP: 10.1.10.81 :
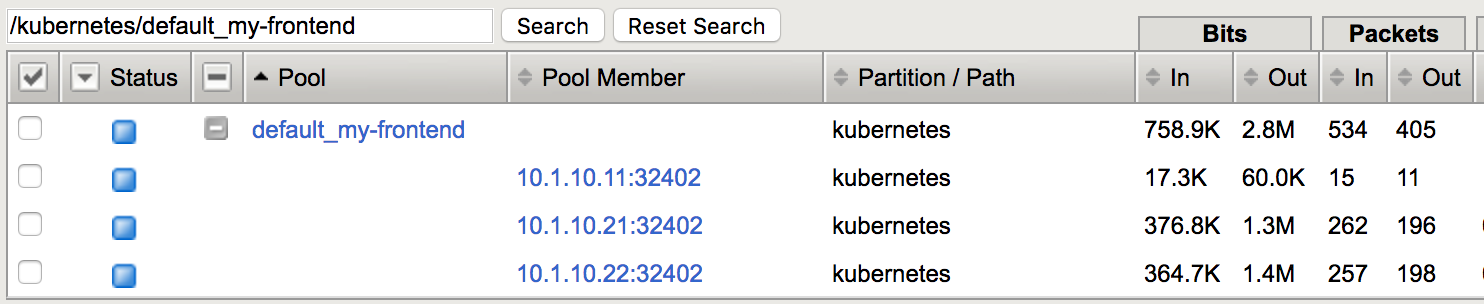
Hit Refresh many times and go to your BIG-IP UI, go to Local Traffic > Pools > Pool list > my-frontend_10.1.10.81_80 > Statistics to see that traffic is distributed as expected
How is traffic forwarded in Kubernetes from the <node IP>:32402 to the <container IP>:80 ? This is done via iptables that is managed via the kube-proxy instances:
On any nodes (master/nodes), run the following command:
sudo iptables-save | grep my-frontend
This will list the different iptables rules that were created regarding our frontend service.
